You know your blog is getting somewhere when you can be found in Food Blog Search. Sure, there are 1,900 blogs listed, but hey, don't spoil my moment.
It was created by Elise of Simply Recipes. You type in whatever recipe you are looking for, and it will search all the blogs in its database. Not in the database? You can send an email (look on the about page) and request to be added.
Wednesday, February 27, 2008
Tuesday, February 26, 2008
Review of Real Player Plus
I received an email last week about receiving a free copy of Real Player Plus, as long as I agreed to do a review. After doing a bit of research to make sure it wasn't a scam, I replied back and agreed to review it.
There are two versions of Real Player. You can download the free version, or you can pay a one-time fee of $39.99 for the advanced version, otherwise known as Real Player Plus. Now, I bet you are wondering - why should you pay $40 for a program when you can get the free version?
From what I understand, although the free version does let you download videos, Real Player Plus saves the videos to your hard drive, which allows you the view the video at any time, even when there isn't an internet connection.
Why was a food blogger asked to review a program that downloads videos? There are plenty of baking and cooking videos out there, You Tube, Metacafe, Nestle, and Kraft, just to name a few. Since Real Player Plus allows you to save the videos to your hard drive, this means you do not need an internet connection to play them back. For those of you who do not have internet access in or near your kitchen, this tool is very useful.
I tried it with the four sites I listed above. You Tube, Metacafe, and Nestle worked fine. When you roll your mouse over the video, a box with appear that says "download this video." You click it and soon you have the video saved. Now, for some reason, it wouldn't play back the Kraft videos. I'm not sure if it's in a weird format or if Real Player Plus only downloads videos from certain sites. This is disappointing because Kraft has some pretty good videos for beginners.
Another feature that seems promising is the ability to put these videos onto your Ipod. Now, I do own a MP3 player that supports video, but it is not an Ipod. I decided to connect my device and see what happens. Although the device was recognized, when I clicked on the media, the program froze. Maybe it's only compatible with Ipod?
I give Real Player Plus 4 out of 5, meaning it is good but isn't something that you must own. If you are someone who learns better from seeing a visual presentation rather than simply reading it and have no internet access in your kitchen, or if you want to put last week's episode of your favorite show on your Ipod so you can watch it while working out at the gym, then Real Player Plus is for you. However, if you are like me and have a laptop with wireless internet in the house, your computer is within easy reach of the kitchen, or your MP3 player makes the program freeze up, then this program isn't necessary.
Saturday, February 23, 2008
Warning - Round Desserts Attract Curious Cats
Cats are intrigued by human food. They must sniff it, lick it, and play with it. Take the Cheerio, for example. My cat stares at it, sniffs it, and *thud* it's on the floor. My dad gave him a donut hole once as a joke, but before you could even take a step back, it was knocked onto the floor. Note to self - do not give Murray the powdered sugar kind because there was a nice trail of white on the floor.
I had a small pack of Oreos leftover from Christmas. When I was home in February, I decided I wanted to bake with them rather than eat them as a cookie. I was going to make cookies and cream cupcakes, but the pack only had six cookies. So I opted to do Oreo truffles. Very easy and only required three ingredients. However, the filling was just cream cheese and crushed cookies. Next time, I might try using pumpkin roll filling so it doesn't taste like I ate a big spoonful of cream cheese with some cookies thrown in.
We didn't let Murray play with these because chocolate is poisoness to pets, but I know he had his eye on them.
Oreo Truffles
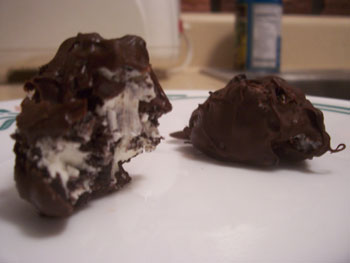
6 Oreo cookies, crushed
2 oz. cream cheese, softened
1 cup semi-sweet chocolate chips, melted
1. Crush the cookies by putting into a plastic sandwich bag and hitting it with a heavy object, such as a can or a rolling pin.
2. If cream cheese is not at room temperature, soften in the microwave until it can easily be stirred. Toss in crushed cookies. Stir until well mixed.
3. Line a cookie sheet with wax paper or foil. Roll cream cheese mixture into small balls. If you are having trouble, place the mixture into the refrigerator for 15 minutes. Place balls on cookie sheet. Place in the freezer for about an hour.
4. When an hour is almost up, melt the chocolate in the microwave. Remove balls from the freezer. Roll them into chocolate until covered. Place back onto cookie sheet. Freeze for 15 minutes or until chocolate is set. Remove from freezer for a few minutes to soften slightly.
Makes 12 balls.
Source: Recipe Zaar
Tuesday, February 19, 2008
Two-In-One Dinners
My dinner schedule for this semester is crazy because although I have time to eat, I don't have time to prepare. I'm trying to make meals ahead of time by making too much when I do have time to cook so I can eat the leftovers later. But instead of eating the same meal twice in one week, I found a recipe that can be made into two different meals - tacos and pasta!
My roommates love to make Hamburger Helper, so when they make the cheeseburger kind, the smell makes me want to go buy a box. Since it is expensive (and high in sodium) to make it from the box, I decided to make it from scratch. When I was browsing for an imitation recipe, I came across bacon cheeseburger tacos. The person who posted it said she used the leftovers to make bacon cheeseburger pasta. Score! I suggest making the tacos first, then use the leftovers for pasta (unless you want pasta in your tacos).
I suggest sprinkling the cheese on top at the very end rather than letting it melt into the meat because you don't taste it as much.
Bacon Cheeseburger Tacos

1/2 lb ground beef
1/2 cup onion, chopped
1 clove garlic, minced
2 Tablespoon bacon bits
1 1/2 teaspoon chili powder
1/4 teaspoon salt
1/4 teaspoon pepper
1 cup shredded cheddar cheese
2-4 lettuce leaves
Sauce
2 1/2 Tablespoons ketchup
1 1/4 teaspoons mustard
1/2 teaspoon chili powder
4-6 small taco shells
In a skillet, cook beef, onion, and garlic until beef is brown. Drain grease. Stir in bacon bits, 1 1/2 tsp chili powder, salt, and pepper. Cook another 10 minutes.
In a small bowl, combine ketchup, mustard, and 1/2 tsp chili powder.
Fill a taco shell with beef mixture. Put on sauce. Top with cheese. Microwave about 10 seconds or until cheese has melted. Add lettuce. Repeat with each shell.
Makes 4-6 tacos, depending on how much beef goes into each taco.
Source: Recipe Zaar
Bacon Cheeseburger Pasta
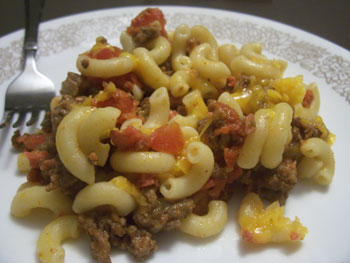
4 oz elbow macaroni
2 Tbsp bacon bits
1/2 lb ground beef
1/2 cup onion, chopped
1 clove garlic, minced
1 1/4 Tbsp chili powder
3 Tbsp ketchup
1 1/2 tsp yellow mustard
1 cup chopped tomatoes
1 cup cheddar cheese, shredded
Cook macaroni according to package directions. Meanwhile, in a large skillet, cook ground beef, onion, and garlic until beef is brown. Drain grease. Stir in chili powder and bacon. Cook another 10 minutes. Add ketchup, mustard, and tomatoes and stir until well combined. Stir in pasta and cheese. Cook over low heat for about 5 minutes until cheese has melted.
Makes 2 servings.
Source: Recipe Zaar
Monday, February 18, 2008
Cherry Cupcakes
I bought Valentine's Day cupcake liners, so I had a good excuse to bake cupcakes this weekend while I was home. There was a jar of maraschino juice leftover from last month, so I had to do something with it. After searching Recipe Zaar, I found a cherry cupcake recipe. I'm glad somebody reviewed it because both the batter and frosting needed more liquid. Although you could taste the cherry, I think I might add 1/4 cup chopped marachino cherries next time to enhance it. Make sure you beat the frosting for at least 3 minutes because as you can see in my picture, if you don't, it will be a little chunky. Since I didn't have any cherries, I used candy hearts for decoration. The recipe posted below has the liquid adjusted. If anybody makes these with the chopped cherries in the batter, please let me know how they turned out.
Cherry Cupcakes

1/2 cup butter, softened
1/2 cup sugar
2 cups flour
2 eggs
1/4 cup + 2 Tbsp maraschino cherry juice
2 1/4 tsp baking powder
1/4 tsp salt
Frosting
1/2 cup butter
1 1/2 cups powdered sugar
1 tsp cherry juice
6 drops red food coloring
12 maraschino cherries
1. Preheat oven to 350F. Combine all cupcake ingredients in a bowl and mix until smooth. Fill lined cupcake pan 2/3 of the way full. Bake for 20-25 minutes or until a toothpick comes out clean. Let cool.
2. Combine all frosting ingredients. Beat until smooth, 3-5 minutes. Top cupcakes with frosting. Top each with a cherry.
Makes 12 cupcakes
Source: Recipe Zaar
Friday, February 15, 2008
I Need Recipe Ideas!!
I got back from Target not too long ago, and I purchased four egg-shaped ramekins ($2.50 + tax - go buy some now!) and three mini heart-shaped springform pans (half-off the day after V-Day, this is why holidays rule). Since I'm home for my best friend's birthday, I don't have time to search for recipes. If you have any ideas, please throw them (gently) my way. I remember seeing a Dorie Greenspan custard recipe on Eat Me, Delicious.
Thursday, February 14, 2008
When Mother Nature Gives You Snow, Bake Bread
All this cold weather makes me crave warm, comforting foods. Lately I've been craving a quick bread of some sort. I didn't have enough bananas, so banana bread was out. I really didn't want applesauce bread nor did I want to shred carrots for carrot bread. I was looking through Quick Bread Winners from Betty Crocker that Anj had given me when I found Glazed Cinnamon Breakfast Loaf. I didn't want any glaze, but the loaf alone sounded good. Plus it uses basic ingredients. Well, almost basic. It calls for buttermilk baking mix (aka Bisquick), but you can make your own. I honestly think you don't need the extra sugar and calories from the glaze, but I'll attach the recipe for those who have a really sweet tooth. It calls for raisins, but feel free to use nuts. I was going to use walnuts, but I forgot.
Cinnamon Breakfast Loaf
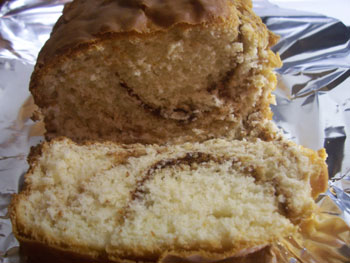
3 cups buttermilk baking mix
1/2 cup sugar
1/3 cup flour
1 egg
1 cup milk
1/4 cup brown sugar
1 1/2 tsp cinnamon
1/2 cup raisins or nuts
Glaze (optional)
3/4 cup powdered sugar
1 Tbsp butter
3/4 tsp vanilla
2-3 tsp hot water
1. Heat oven to 350F. Grease a 9x5x3 loaf pan.
2. Beat baking mix, sugar, flour, egg, and milk on low speed of mixer 30 seconds. Beat on medium speed for 3 minutes. Stir in raisins/nuts. In a separate bowl, mix brown sugar and cinnamon. Pour 1/3 of the batter (2/3 cup) into pan. Sprinkle layer with 3 Tbsp cinnamon mixture. Repeat 2 more times.
3. Bake for 55-60 minutes or until a toothpick comes out clean when inserted in the center. Cool 10 minutes before removing from pan. Cool completely before drizzling with glaze.
4. Glaze: Beat sugar, butter, vanilla, and water until smooth consistency. Drizzle on bread when cool.
Source: Quick Bread Winners from Betty Crocker, 1985 p.61
Tuesday, February 12, 2008
Marye's Package
Sometimes I wonder how people think. We got at least 5 inches of snow this morning. Every elementary, junior, and high school in the area were closed. Community colleges were closed. Yet, despite the fact you couldn't see roads nor sidewalks or that the wind chill was below 0, my university decided to stay open and have class. Fortunately, 2 out of 3 classes were cancelled from profs who are reasonable and didn't want anybody to die. Finally, we all got an email saying night classes were cancelled. I only have night class on Mondays, so this didn't matter. But at least the school is starting to become somewhat smart. The weather people are calling for freezing rain. So glad I only have one class tomorrow.
Anyway, I bet you all are wondering what Marye sent me in her favorite things package. How about I just show you?

First off, I bet the mail room was jealous because the box smelled so good! I got custom-blend blackberry rose lemon tea leaves, custom-roasted coffee beans, bourbon pecan coffee beans, Godiva chocolates, chai spice tea, and soap from Lush. I haven't tried the tea yet because I do not own a strainer. I believe my parents have a strainer, so the tea will have to wait. The coffee is delicious. I grinded the beans for both drip coffee and espresso. The bourbon pecan definitely has a strong smell because I can smell it every time I open my cabinet door lol The chocolates threw me by surprise (in a good way, Marye!). The first chocolate was milk chocolate on the outside and milk chocolate on the inside, so I thought the dark chocolate one had dark chocolate inside. Wrong! It was chocolate liquor! What a nice surprise while I was studying for my art exam LOL I still have yet to try the bath bombs and soap. Thank you Marye for sharing your favorite things!
Also, you may notice on the right an ad for Food Buzz. They decided to make me one of their featured publishers! All I have to do is keep blogging and display their banner. The best part is if I get enough people to click their link, I get paid! Not a whole lot of money, but anything to help me buy more food. So please, take a minute, click on the banner over on the right, and discover new blogs today.
Thursday, February 7, 2008
Adopt Me?
I can't believe I didn't hear about Kristen's Adopt-a-Blogger event until I visited Megan's blog. I missed the deadline. I haven't been around for an entire year, so I would be a newbie blog. Does anybody who also missed the event want to adopt me? I'm hoping there is another adoption sign-up soon.
Layout is pretty much finished. I'm trying to fix the spacing in the sidebars and get a better picture for my main banner, but it'll do for now. Thanks for all of your compliments :)
Layout is pretty much finished. I'm trying to fix the spacing in the sidebars and get a better picture for my main banner, but it'll do for now. Thanks for all of your compliments :)
Monday, February 4, 2008
Updating
As you can see, I made a new layout. After multiple background and color attempts, I finally like this color scheme. Now to work on the main banner.
Saturday, February 2, 2008
Something Smells Fishy In Here
Studying in Ireland was the first time I bought groceries for myself. I decided instead of buying tuna all the time, I would try salmon. Note to self - when buying salmon, make sure it is labelled "boneless and skinless." Why would you buy salmon with bones? It took me at least 15 minutes to pick the tiny discs out. Never again. During the last week of Christmas break, I promised my dad I would make salmon patties with cream sauce if he would buy a can of salmon. Well, he did, and I kept my promise. His mother used to make it for him all the time, and I tried my best to duplicate it. I'm sure you could use substitute tuna or crab for the salmon.
Salmon Patties with Creamed Pea Sauce
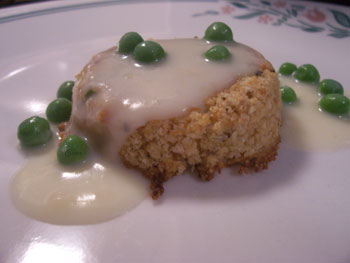
1 teaspoon vegetable oil
1/4 cup onion, finely chopped
1 clove garlic, minced
1/2 cup green bell pepper, finely diced
1 tsp Italian seasoning (you can also use parsley or basil)
15 oz canned salmon, drained (make sure it says boneless and skinless)
1 egg, lightly beaten
1 1/2 cups breadcrumbs
Sauce
2 Tbsp butter
2 Tbsp flour
1 cup milk
1/2 cup frozen peas, thawed
1. Preheat oven to 450°F. Grease cookie sheet.
2. Heat oil in a large nonstick skillet over medium-high heat. Add onion and pepper; cook, stirring, until softened, about 3 minutes. Stir in seasoning; remove from the heat.
3. Put salmon in a medium bowl. Flake apart with a fork. Add egg, mix well. Add onion mixture, and breadcrumbs. Shape the mixture into 8 patties. I found that packing the mixture into a 1/4 measuring cup works really well. Bake until golden on top and heated through, 15 to 20 minutes.
4. Sauce: Melt butter in saucepan over low heat. Blend in flour. Cook over low heat, stirring until mixture is smooth and bubbly. Remove from heat. Stir in milk. Heat to boiling, stirring constanty. Boil and stir 1 minute. Add peas. Spoon over each salmon patty.
Makes 4 servings.
Source: Patties adjusted from Recipe Zaar; sauce also from Recipe Zaar
Friday, February 1, 2008
Bundt Pans - Not Just For Dessert
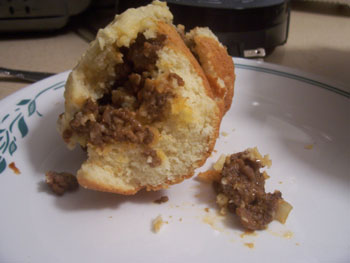
I love my bundt pan, but I hardly use it. When I came across two recipes by Bisquick, I had to make them during Christmas break. The best part is that they are dinner recipes. Score! So far, I only made the Hidden Sloppy Joes. The variation is called Hidden Reuben, so maybe I'll try that when I'm on spring break. The original recipe called for condensed chicken gumbo soup, but canned soup is unhealthy, so I searched Recipe Zaar and adjusted the filling a bit. The filling was so amazing, I'm never going to use Manwich again! The filling is a tad on the sweet side (in a good way), so if you are oversensitive to sweet stuff (like my mom), you may not enjoy it as much.
In case you seem a bit disoriented, the "cake" in the picture is flat-side up. It rolled over on its side and wouldn't stay LOL
Hidden Sloppy Joes
1 pound ground beef
1/2 cup onion, chopped
1 clove garlic, minced
3 Tbsp ketchup
2 Tbsp prepared mustard
2 Tbsp sugar
2 Tbsp vinegar
2 Tbsp Worcestershire sauce
3 cups baking mix, such as Bisquick
2/3 cup milk
2 Tbsp butter, softened
2 eggs
1. Cook and stir ground beef, onion, and garlic until beef is brown; drain grease. Pat down beef to remove remaining grease. Stir in ketchup, mustard, sugar, vinegar, and Worcestershire sauce. Heat to boiling; reduce heat. Simmer uncovered, stirring occasionally, 5 minutes.
2. Heat oven to 375F. Grease bundt cake pan. Mix baking mix, milk, butter, and eggs. Beat 30 seconds. Spread 2 cups of batter in bottom and up sides and center of pan. Spoon beef mixture onto center of batter. Drop remaining batter about 1/2 inch apart on top. Bake until light brown and firm, 25 minutes. Let cool for 10 minutes; then invert onto serving plate.
Makes 6-8 servings (depending on how big you cut the pieces)
Source: "The Best of Bisquick from Betty Crocker," 1983 p. 16
In case you seem a bit disoriented, the "cake" in the picture is flat-side up. It rolled over on its side and wouldn't stay LOL
Hidden Sloppy Joes

1 pound ground beef
1/2 cup onion, chopped
1 clove garlic, minced
3 Tbsp ketchup
2 Tbsp prepared mustard
2 Tbsp sugar
2 Tbsp vinegar
2 Tbsp Worcestershire sauce
3 cups baking mix, such as Bisquick
2/3 cup milk
2 Tbsp butter, softened
2 eggs
1. Cook and stir ground beef, onion, and garlic until beef is brown; drain grease. Pat down beef to remove remaining grease. Stir in ketchup, mustard, sugar, vinegar, and Worcestershire sauce. Heat to boiling; reduce heat. Simmer uncovered, stirring occasionally, 5 minutes.
2. Heat oven to 375F. Grease bundt cake pan. Mix baking mix, milk, butter, and eggs. Beat 30 seconds. Spread 2 cups of batter in bottom and up sides and center of pan. Spoon beef mixture onto center of batter. Drop remaining batter about 1/2 inch apart on top. Bake until light brown and firm, 25 minutes. Let cool for 10 minutes; then invert onto serving plate.
Makes 6-8 servings (depending on how big you cut the pieces)
Source: "The Best of Bisquick from Betty Crocker," 1983 p. 16
Subscribe to:
Posts (Atom)