Sunday, June 29, 2008

Can't Decide? Have Both!

Everyone has made this tough decision at some point - chocolate or vanilla? Why not have both? Dorie did just that with her Split-Level Pudding. The bottom layer is chocolate ganache while the top layer is vanilla pudding. I enjoyed this dessert because you can serve the pudding in individual dishes and not worry about sharing or cutting into equal portions. My parents received these mugs as a wedding gift, and I absolutely adore them. We hardly use them because we own a ton of coffee mugs (95% of them are mine: cute and/or witty). Plus Dorie's recipe calls for six ramekins and I only have four.


Split-Level Pudding


Chocolate Layer
2 oz bittersweet chocolate, finely chopped
1/3 cup heavy cream

Vanilla Layer
2 1/4 cups whole milk
6 Tbsp sugar
3 Tbsp cornstarch
1/4 tsp salt
3 egg yolks
2 Tbsp butter, room temperature
2 1/2 tsp vanilla extract

1. Chocolate Layer: Put chocolate in heat-resistant bowl. Bring heavy cream to a boil in a saucepan. Pour over the chocolate and let sit for 30 seconds. Gently stir to blend. Divide among 6 four-ounce ramekins/pudding cups.

2. Vanilla Layer: Bring 2 cups of whole milk and 3 Tbsp sugar to a boil in a medium saucepan. In a blender or food processor, blend 3 Tbsp sugar and egg yolks for 1 minute. Add remaining 1/4 cup milk and pulse just to mix. Then add cornstarch and salt and pulse a few more times.

3. While the machine is still running, very slowly add hot milk mixture. Process for a few seconds more, then pour everything back into the saucepan. Whisk without stopping over medium heat until the pudding thickens and some bubbles burble and pop on the surface. Do not let it boil completely, so if it hasn't thickened yet, feel free to turn down the heat.

4. Scrape the pudding back into the machine (avoid any scorched spots) and pulse a few more times. Add butter and vanilla and pulse until evenly blended.

5. Pour the pudding evenly over each chocolate layer in the ramekins/cups. Press a piece of plastic wrap over each surface. Refrigerate for at least 4 hours.

Source: Baking: From My Home To Yours, 2006 p. 384

Tuesday, June 17, 2008

When You Just Don't Want To Share

I love Taste of Home magazine. Anj from Gulf Coast Gram sent me some awhile ago, and I fell in love, so I signed up for a free copy from the ToH website. In their Cooking for Two edition, they have several dessert recipes, and this Boston Cream Sponge Cake caught my eye. Back in February, I bought 3 small heart-shaped springform pans on sale. I've only made cheesecake in them, so I thought this cake would be perfect. It calls for a 4-inch round pan, and since my heart pans were also 4 inches, it worked out fine.

This would be perfect to make after a special dinner with a loved one because you don't have to share. And trust me, you're not going to want to share.


Boston Cream Sponge Cake


2 eggs
6 Tbsp sugar
1/4 tsp salt
1/2 tsp vanilla extract
1/2 cup flour

Custard
1/4 cup sugar
2 tsp cornstarch
1/2 cup milk
2 egg yolks, lightly beaten
1/2 tsp vanilla extract
3 Tbsp butter, softened

Frosting
1/2 cup powdered sugar
5 tsp heavy whipping cream
1 Tbsp butter, softened
1/2 square (1/2 oz) unsweetened chocolate, melted and cooled
1/2 tsp vanilla extract

1. Preheat oven to 350F. In a small bowl, beat eggs until light and fluffy. Gradually add sugar and salt, beating until thick and lemon-colored, about 5 minutes. Stir in vanilla. Fold in flour, 2 Tbsp at a time. Spoon into two greated 4-inch springform pans (they will be full). Bake 15-20 minutes or until cake springs back when touched. Cool for 10 minutes before removing from pans to cool completely.

2. Custard: In a small pan, combine sugar and cornstarch. Stir in milk until smooth. Cook and stir over medium heat until thickened and bubbly. Reduce heat; cook and stir 2 minutes longer. Remove from heat. Stir a small amount into egg yolks before adding them to the pan (Adding a little bit of heat first will keep it from turning into scrambled eggs). Bring to a gentle boil; cook and stir 2 minutes longer. Remove from heat and let cool to room temperature without stirring. Once cool, cream butter and gradually beat in custard.

3. Frosting: Beat frosting ingredients until mixed.

4. To assemble, cut each cake in half horizontally. Place bottom layers onto two serving plates. Spread each with filling. Replace cake tops. Spread frosting on top. Refrigerate until serving.

Makes two 4-inch cakes.

Source: Taste of Home Cooking For 2, Winter 2008 p.22

Saturday, June 14, 2008

Una Ensalada Refreshcante

With the hot weather upon Pennsylvania, sometimes you just want a nice, refreshing salad. The cool lettuce, the juicy tomatoes, the taco meat. Ok, so there is a little bit of cooking involved, but the balance of hot and cold makes this meal acceptable in June. Well, my family at least accepted it. Plus it doesn't take long to assemble. I didn't measure the produce. I just eyeballed it until the bowls looked full.


Taco Salad Bowls


4 flour tortillas, 8 inch
1 Tbsp chili powder
3/4 lb ground beef
1 cup carrot sticks, julienned (very thin sticks)
1/2 cup + 2 Tbsp salsa
2 Tbsp sour cream or mayonnaisse
4 cups torn lettuce
1 tomato, chopped
1/2 cup shredded cheddar cheese

1. Preheat oven to 425F. Crumple 4 pieces of foil to make four 3-inch balls. Place on baking sheet. Drape one tortilla over each ball. Spray with cooking spray and sprinkle evenly with 1/2 tsp chili powder. Or brush each tortilla with melted butter and 1/2 tsp chili powder. That means 1/2 tsp chili for 4 tortillas, not 1/2 tsp each. Bake for 8 minutes or until golden brown. They will harden as they cool.

2. While the tortillas are baking, brown meat with carrots and remaining 2 1/2 tsp chili powder. Once brown, drain grease and add 1/2 cup salsa. Cook for another 2 minutes.

3. In a small bowl, mix sour cream or mayo with 2 Tbsp salsa.

4. Once tortillas are cool, put lettuce into each one. Top with tomatoes. Add meat mixture. Top with salsa mix. Finish with some cheese.

Serves 4.

Source: Kraft Food and Family, Spring 2008, p. 19

Tuesday, June 10, 2008

Bananas For You

When there are leftover, overripen bananas in the house, I tend to make banana bread. However, it has been happening a lot this summer, so I'm getting bored with it. I decided to search around in my cookbook collection and find a new recipe. I found several options but decided to go with Ms. Greenspan's Cocoa-Nana Bread. Just like the name states, it is chocolate banana bread. This one is definitely a keeper (then again, all of Dorie's recipes are). I followed the directions exactly, including putting the loaf pan on a cookie sheet while baking. She notes that it will add extra installation and prevent the bottom of the bread from overbaking. I guess it worked because it turned out fine.


Cocoa-Nana Bread


2 cups flour
1 cup unsweetened cocoa powder
1 1/2 tsp baking powder
1/2 tsp salt
1/4 tsp baking soda
8 Tbsp butter, room temperature
3/4 cup sugar
1/2 cup brown sugar
2 eggs
2 ripe bananas, mashed
3/4 cup buttermilk
1/2 cup chocolate chips

1. Preheat oven to 350F. Grease 9x5 loaf pan and place on an insulated baking sheet.

2. Sift together flour, cocoa, powder, salt, and soda.

3. In a large bowl, beat butter at medium speed for 1 minute. Add both sugars and beat another 2 minutes. Add eggs, one at a time, beating for a minute after each addition. Reduce speed to low and beat in bananas. Add dry ingredients in 3 additions, mixing only until they disappear into batter. Add buttermilk, mixing until incorporated. Stir in chocolate chips. Pour into pan.

4. Bake for 30 minutes. Cover with foil. Bake for another 40-45 minutes or until toothpick comes out clean. Let cool for 20 minutes before removing from pan. Then let cool to room temperature.

Source: Baking: From My Home To Yours, 2006 p.46

Wednesday, June 4, 2008

I've Been Tagged!

Thanks to everyone for my mom's recovery comments! Everything went well, just a very minor outpatient surgery, and she enjoys the brownies very much.

Also, Marye of Kettle and Cup is having a coffee giveaway in honor of her husband's birthday. Happy birthday, Marc!

Finally, April of Abby Sweets has tagged me. The rules are you must answer the questions and you must tag five other people who will also answer these questions and pick another five people.

What were you doing 10 years ago?
1998: Hm, well I was 10 years old, so I wasn't doing much. I was in 5th grade, so I was taking clarinet lessons, participating in a stamp club, and getting ready for middle school.

What are five (non-work) things on my to-do list for today:
*Call Manda
*Get directions from Steve
*Text Nikki about internship stuff
*Eat
*Try not to fall asleep

Five snacks you enjoy?
1. Carrots
2. Cheese curls
3. Chocolate
4. Crackers (not saltines)
5. Cookies

Five things you would do if you were a billionaire
1. Take my dad to Naples, Italy for what would've been his dad's 100th birthday in 2009.
2. Travel the world with friends and family..
3. Buy an RV.
4. Pay off family debt and student loans.
5. Go to film school.

Places you have lived:
*Irwin, PA
*Slippery Rock, PA
*Limerick, Ireland

Jobs you have had:
*Rave (clothing store)
*PA Center for Environmental Education Web Site Updater
*Communication Lab Assistant
*Intern at Fox 53 (commercial production)

Now I pick:

Javagirlkt's Cookin'
The Cookbook Junkie
Peanut Butter Boy
Cooking in Cleveland
Chef-girl.net

Tuesday, June 3, 2008

Tuesdays With Dorie - French Chocolate Brownies


I followed the rules for once! For 
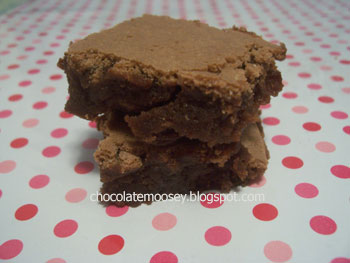
Tuesdays with Dorie, I made the chosen recipe - French Chocolate Brownies. What is so French about them? Nothing special except Dorie created the recipe in Paris. I was tempted to go buy rum (I still have yet to buy anything from the liquor store since I turned 21), but my mom hates rum and wouldn't eat the brownies. I decided since she is going in for (minor) surgery today, I would make them so she would like them.

You can definitely taste the cinnamon, even though it is only 1/8 tsp. It gave the brownies a different taste. Raisins were also a nice addition, but if you hate raisins, sub another dried fruit. I didn't have any bittersweet chocolate, so I used semi-sweet. The brownies took an extra ten minutes to bake than what Dorie suggested. The top is crumbly when you try to cut them, which I didn't like too much. They were good, and I would make these again.

I didn't put the 8x8 pan on a baking sheet and I melted the chocolate in the microwave. No problems there, so do whatever is easier for you.


French Chocolate Brownies


1/2 cup all-purpose flour
1/8 teaspoon salt
1/8 teaspoon cinnamon
1/3 cup raisins
1 1/2 tablespoons water
1 1/2 tablespoons dark rum (optional)
6 ounces bittersweet chocolate, finely chopped
12 tablespoons butter, at room temperature and cut into 12 pieces
3 large eggs, at room temperature
1 cup sugar

1. Center a rack in the oven and preheat the oven to 300°F. Line an 8-inch square baking pan with foil, butter the foil, place the pan on a baking sheet, and set aside.

2. Whisk together the flour, salt and cinnamon, if you're using it.

3. Put the raisins in a small saucepan with the water, bring to a boil over medium heat and cook until the water almost evaporates. Add the rum, let it warm for about 30 seconds, turn off the heat, stand back and ignite the rum. Allow the flames to die down, and set the raisins aside until needed.

4. Put the chocolate in a heatproof bowl and set the bowl over a saucepan of simmering water. Slowly and gently melt the chocolate, stirring occasionally. Remove the bowl from the saucepan and add the butter, stirring so that it melts. It's important that the chocolate and butter not get very hot. However, if the butter is not melting, you can put the bowl back over the still-hot water for a minute. If you've got a couple of little bits of unmelted butter, leave them—it's better to have a few bits than to overheat the whole. Set the chocolate aside for the moment.

5. Working with a stand mixer with the whisk attachment, or with a hand mixer in a large bowl, beat the eggs and sugar until they are thick and pale, about 2 minutes. Lower the mixer speed and pour in the chocolate-butter, mixing only until it is incorporated—you'll have a thick, creamy batter. Add the dry ingredients and mix at low speed for about 30 seconds—the dry ingredients won't be completely incorporated and that's fine. Finish folding in the dry ingredients by hand with a rubber spatula, then fold in the raisins along with any liquid remaining in the pan.

6. Scrape the batter into the pan and bake 50 to 60 minutes, or until the top is dry and crackled and a knife inserted into the center of the cake comes out clean. Transfer the pan to a rack and allow the brownies to cool to warm or room temperature.

7. Carefully lift the brownies out of the pan, using the foil edges as handles, and transfer to a cutting board. With a long-bladed knife, cut the brownies into 16 squares, each roughly 2 inches on a side, taking care not to cut through the foil.

Source: Baking: From My Home To Yours, 2006 p.92